Gallery
The Gallery is an asset manager in Nuke Stage that enables you to load, manage and access assets across your projects. If you have a particular sequence or node graph that you want to use across various projects, the Gallery is a great way to quickly access and load that asset into Nuke Stage.
Accessing the Gallery
The Gallery can be accessed as a panel in Nuke Stage Editor - click the panel button icon (
 ) and search Gallery. This will load the Gallery panel.
Managing the Gallery
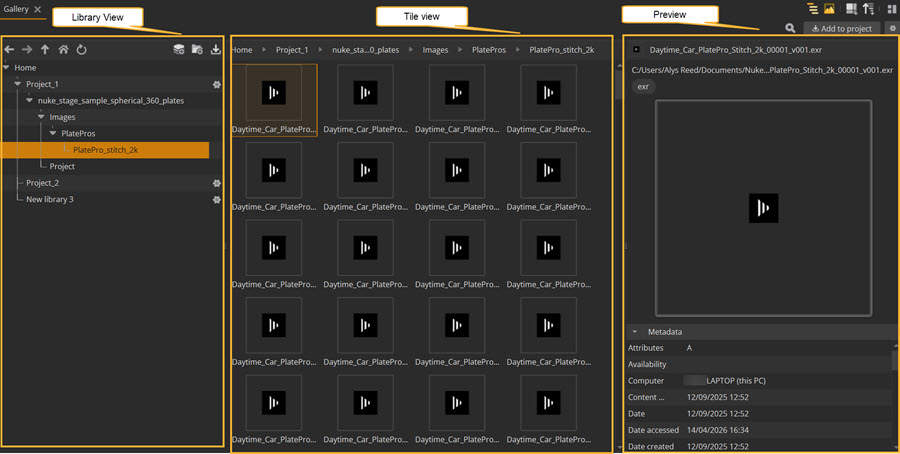
There are three sections to the Gallery. The Library View, the Tile View, and the Preview.
You can use the following controls to manage your gallery:
|
Control (UI) |
Function |
|
Show sidebar / Library view ( |
Select whether to show or hide the Library View sidebar column. |
Show preview ( ) ) |
Select whether to show or hide the Preview column. |
Icon size ( ) )
|
Define how large the icons will appear in the Tile View. Can also select whether to display hidden assets. |
Asset sorting ( ) )
|
Select whether to view the assets in the Tile View in ascending or descending order. |
Search icon ( ) ) |
Search in the Tile View for assets. |
Add to Project button ( ) ) |
Add selected asset to your current project. |
Settings icon ( ) ) |
Open up the Gallery preferences, which includes options for defining the gallery Config path and toggle whether to show hidden assets. |
 )
)Library View
On the left-hand side of the Gallery is a tree-list library view. A Library is a view of an asset system, displaying all of the directories of the system.
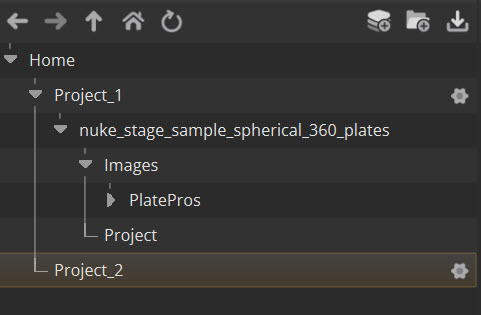
This is a source of the assets available to your projects. You can click on any level of the selected library to open up its contents and expand child folders of that level. When you do this, the breadcrumb bar above of the Tile View will display a green progress bar whilst the asset information loads in the tile view. Specific files will not appear in the Library View, they will instead be viewed in the Tile View.
You can choose to hide or show the Library view by toggling the Library view icon. Alternatively click the backslash key (\) to toggle this.
To create a new Library:
| 1. | Click the Add Library icon (
 ). A new library will be created in the Library View. ). A new library will be created in the Library View. |
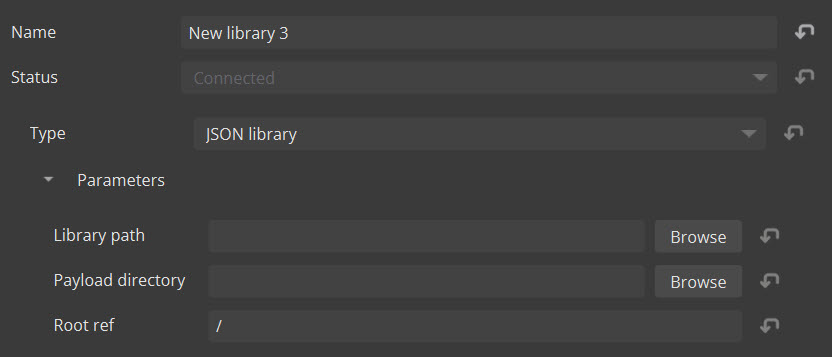
| 2. | Click the settings icon () for the new library. This will open up configuration options. |
| 3. | From here you can edit the settings of the library, such as renaming the title. |
| 4. | In the Type parameter, choose either Filesystem or Bin. |
- Filesystem - this option points to a directory on your machine’s disk or network. This location is defined at the Root directory parameter, and by default points to your machine’s Home.
- Bin - points at a JSON file which lists the assets the library owns - which includes the payload file name as well as metadata. This is useful for sharing assets across production, or for creating transient collections of assets that are organized differently to the filesystem. Bin Parameters:
From here you can add a new directory ( ) into your new library for further organization. When using the Filesystem Type, creating a new directory will also create a new directory in your Root Directory, and edits (such as renaming and deleting) will update both in the Gallery and on your Root Directory.
Warning: If you delete files from a filesystem library, they will also be deleted on your machine's Root Directory. To undo a delete action, go to your machine's Windows Explorer and use the Ctrl+Z shortcut to remove the deletion. This cannot be done within Nuke Stage. If the file has the symlink icon next to it, then deleting the file will delete the symlink, not the original file.
The Add Files button ( ) will open up your file browser so you can add additional assets to your Library.
To navigate through your Library view you can use the following tools:

Tile View
The Tile View displays all of the assets within the selected level of the Library. You can also navigate using the breadcrumb list at the top of this view to go back levels. When you click on a specific asset in the Tile View, a Preview will pop up of the selected asset.
You can change the size of the tile icons using the tile size icon (). Alternatively use the hotkeys Ctrl+1 - Ctrl+4 to switch between different icon sizes.
To sort the order of the icons, you can use the Ctrl+Up arrow hotkey for ascending and Ctrl+Down arrow for descending, or use the order icon ().
Preview
Note: Previews are only supported in the Filesystem library for file types that Windows can understand.
The Preview section of the Gallery provides preview information of the selected asset. This includes a still frame of the asset, the payload path, as well as Metadata. The metadata displayed is any information that the asset system provides.
You can toggle the Preview visibility by using the Preview icon () or by using the forward slash hotkey (/).
Using the Gallery
The gallery provides an efficient method to grouping assets together and referencing them to save time from having to search for them in specific locations on disk. The Gallery is accessible across all of your projects as it is a separate file on your machine.
You can drag an asset from within the gallery into a project to use that asset. Nuke Stage will load the asset in a suitable area of the project. For example, an image sequence brought in will open as a Read and Output node on the Node Graph, whilst a .py file will open in the Python panel.
You can also drop files directly into the node graph. This can be helpful if you have a node graph you want to use across multiple scenes. You can also drag and drop sequences into the node graph - a Read node will be created with the asset as the file path.
Adding Assets to the Gallery
Files
Drag and Drop workflows
You can add specific assets to your Gallery by dragging and dropping them from outside the app into the Gallery panel. This will create a path to that asset on disk. This means that if an asset is edited, those changes will also apply from within the gallery.
Alternatively, you can hold Ctrl and drag and drop to create a copy of the asset in your Gallery. In this case, any changes made to the original asset on disk will not be carried over to the gallery. For both of these options, the original asset will not be altered if you delete the copy/path from your gallery. This can be helpful for organizing distributed assets into one place.
Controls to Add files
You can also use right-click+Add Files (or use the hotkey Ctrl+Shift+I) to add one or multiple files to the gallery.
They will be added into the level of the library you have selected. If you want to include files into a sub-directory in your library, simply click on the sub-directory’s tree item and add files from that level.
Alternatively you can use the Add Files button ( ) to open up the file explorer, or drag and drop files directly from the system file browser into the gallery.
Note: You can’t copy and paste assets between different libraries in your Gallery.
Managing Files in the Gallery
You can rename and delete files via the right-click context menu. If you delete a file in the filesystem library, it will also delete on your machine. However, if the file has a symlink icon next to it, then the original file is not affected by changes made in the gallery - only the symlink will be renamed/deleted.
You can also copy the payload path if a file contains the payload, so you can easily access this file.
Objects
You can also add Objects from your Project into your Gallery. This means if you have a particular camera or display setup in your Project Graph, you can save it in the Gallery and quickly access it for use in another project.
To do this, middle-mouse drag an object from the Project Graph into the Gallery, to save it for later. You can also use this action for whole Node Graphs, so you can reuse a node graph in the future without having to rebuild it.
Note: When you add an object from your Project Graph into the Gallery, it copies that object into the Gallery. This means if the original object is edited, the version in the Gallery will not be affected. However, if you add a node graph, sequence or image from your project into the Gallery, it will just be a filepath pointing to the original asset. So if the images or nodes are updated, then the version in the Gallery will also be updated.
When you import certain assets (such as a USD file or a timecode source) from the Gallery into a project, they will overwrite the property values with the incoming file’s properties. A notification will pop up to confirm that you want to do this. Clicking No will roll back the import.
Adding Gallery Assets to Projects
Select an asset in your library and you can right click and select Add to Project, or click the Add to Project button.
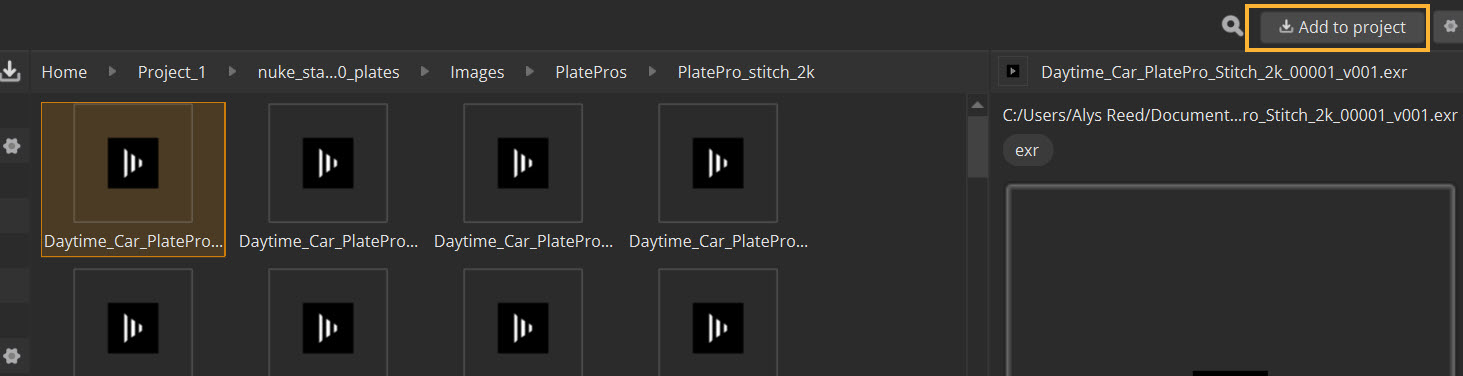
The Add to project button will turn green if the asset is successfully added to your project. If there is an error, the button will turn red and an error message will appear.