Generating a Render Turntable
| 1. | Right-click on the projector and select Render Turntable from the dropdown menu. |
The Render Turntable dialog box displays.
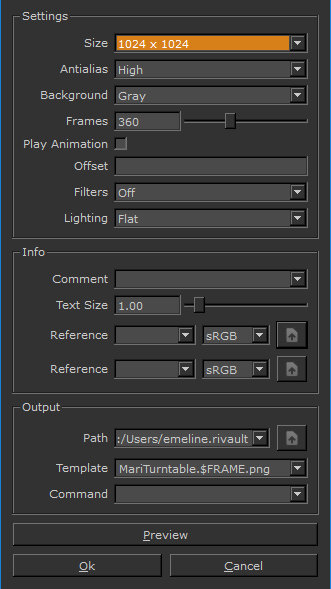
| 2. | Set the basic image details: |
• size of the generated images
• the amount to Antialias the images.
• background for the images - either gray, transparent or the current background in Mari.
• the number of Frames to generate - that is, how many images should be in the sequence.
| 3. | If you are using animated models or textures and want to render the turntable with the animation, check Play Animation. This disables the Frames control above because the frame range is taken from |
| 4. | If you are combining multiple turntables, select an Offset. This lets you chain together sequences, by offsetting the image numbers. |
For example, with an offset of 0, the first image is MariTurntable_1.jpg. With an offset of 360, the first image is MariTurntable_361.jpg. You can use this to generate one sequence of frames for one axis, then move your model around and make another set of frames for another axis.
| 5. | By default, the turntable images use the Example LUT (and any other visual filters you have applied to the view). If you want to create the images without a LUT, set the Filters to Off. |
| 6. | Pick the Lighting for the turntable images. You can pick Flat, Basic, or Full lighting. |
| 7. | You can also include reference images and text in the turntable images. If you want to include any other information in the turntable files, enter the details: |
• You can set a Comment (and change the Text Size) - Mari includes this at the bottom of the turntable.
• You can also select up to two Reference images - Mari includes these to the left of your model. Specify the colorspace for each image (sRGB or Linear).
| 8. | Set the Path where Mari should create the images, and set the Template for the filenames. |
This must include the $FRAME variable, so Mari assigns the frame numbers correctly to the files. Mari can export turntables as either .tif, .png, .jpg, or .tga files - change the file extension in the Template to set the file type.
| 9. | Finally, you can enter any shell Command that you want Mari to run on the files once it finishes creating them. |
| 10. | If you want to check the placement of your reference images and comment text, click Preview. This generates the first image of the turntable so you can check the appearance. |
| 11. | Click OK. |
Mari generates a series of images for the turntable.